
Plinth Armor Sheet
The sheet is opened by choosing the menu option Edit|Armature|Plinths.
After having sized the plinth reinforcements, the Edit Plinth Reinforcements option allows you to review all the defined plinths one by one and to have immediate graphical control of the arrangement of the reinforcements and the stresses in the materials on the various edges of the section.
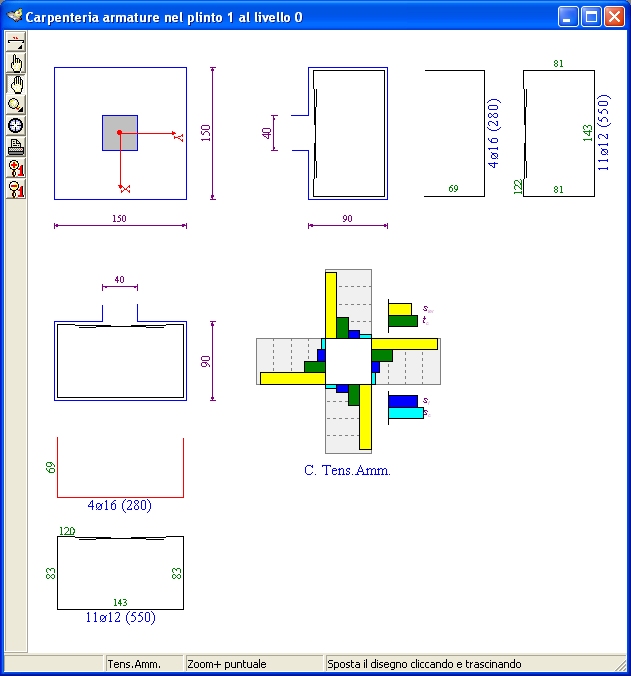
The top left of the graphics window shows the horizontal section of the plinth, which also shows the dimensions of the upper pillar. As with the pillar sections, the section is oriented on the screen so that the main direction of the upright appears horizontal on the screen.
The drawing also shows two vertical sections of the plinth with the corresponding reinforcement lists. The first refers to the primary direction and is aligned below the plan view. The second refers to the secondary direction and is aligned to the right and with respect to the plan view.
In the lower right quadrant, the drawing of the section oriented with respect to the reference X and Y axes appears and, upon command, the bar diagram of the stresses on the four edges of the plinth.
After activating the sheet opening command, it appears in the format shown in the following figure, where it is possible to identify the various components responsible for carrying out the appropriate drawing operations.
The window contains the usual management components, already encountered in other graphic windows:
- the title bar, which displays the plinth reference;
- the toolbar, with the buttons associated with the work tools;
- the status bar, which displays verification references and messages about the operation in progress.
Toolbar
The toolbar consists of the following buttons:
 Irons Element: Opens the longitudinal irons tool panel.
 Locate Item: Allows you to select an item by clicking it with the mouse and synchronize all open windows with respect to the clicked item.
 Move the drawing: Allows you to move the drawing by clicking and dragging the mouse.
 Zoom: opens the zoom toolbar.
 Default View: Resizes and centers the drawing proportionally to the window size.
 Print Preview: Enables a print preview of the drawing.
 Enlarge fonts: increases the font size of the characters.
 Reduce fonts: reduce the font size of the characters.
Changing the plinth
You can quickly change the displayed plinth by clicking on the buttons on the frequent command bar
 to move to the next plinth
 to move to the previous plinth
Drawing options
The drawing options are accessible from the popup menu that appears, as already mentioned, by right-clicking on the drawing area or from the keyboard using the
Please refer to the previous paragraph cited above for an introduction to common usage methods and character sizing criteria.
